Click below to visit my Etsy Shop!

Wednesday, February 27, 2013

Art Smocks


Drake got an easel from Santa this year.  He's really been interested in art ever since he started a new preschool this year, and they have an art center.   Paintings after paintings have come home (have you seen the app Artkive ? You snap pictures of kid art, tag them with the kids name, date and a title, description, etc.  Cuts down on art clutter! You can even make a photo book with them pics...Genius!)  Anyway, Drake's art has gone from scribbles to this in the last few months (I did the left two cars, he copied the last one on his own! BTW the lines on the houses are Christmas lights!)


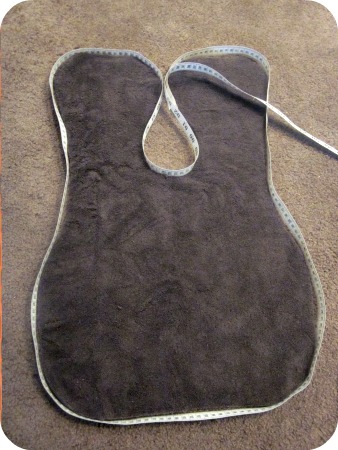
The downside of the marker board is that marker gets on his clothes.  So let's make some smocks! I found this tutorial on Pinterest (of course).  It has a downloadable pattern and is cut out from an old towel.  I had the perfect one, a plush Restoration Hardware one that had a stain and some pulls in it.  I was able to get two smocks cut out from one towel, folding the long ends in to the middle.  The tutorial says the pattern is for a 2T.  I cut it out exactly for my 14 month old, and you can see how I made it longer and wider for Drake, who is 4.5.


The pattern calls for extra wide double fold bias tape.  I didn't have any store bought, so of course I decided to make my own.  So much cuter, using scraps from old projects!  I measured around each smock to see how much bias tape I'd need.  For the pattern as is, I made 95" (includes a few inches to spare) and 105" for the larger one.


Then I got to cutting bias strips.  I used fabric from both kids' curtains (both Amy Butler, love her fabric!).  I had juuuust enough. Love the rotary cutter and mat!


When joining bias strips, I can never figure out how much to overlap them to get a nice continuous piece.  So this is what I do: I press the seam allowance:


And then line them up and pin them.  Viola! Perfectly aligned strips.


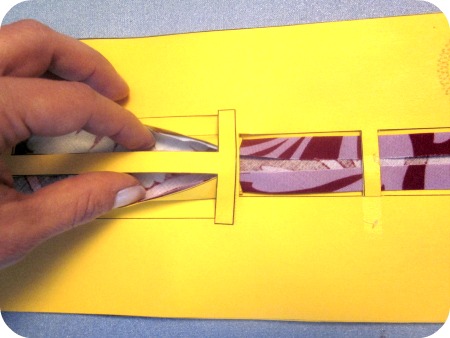
Once the strips are sewn, seam allowances clipped and pressed open, time to iron it into bias tape.  I came across this lovely bias tape maker on a blog called The Scientific Seamstress (LOVE the name!).  You download and print two sheets on cardstock, cut out the pieces, do some gluing and you have yourself a handy dandy bias tape maker.  You feed the tape in from the left, and pull it through, pressing with the iron as you go:


Some comments on her blog says it's a bit finicky, but I didn't have a problem, the only thing I did do was to hold my fingers like so (pressing the fabric to the cardstock), to create some tension and to keep the fabric from slipping:


Look at this beautiful bias tape! So much cuter than the plain stuff you can buy in the store!


I opened up the bias tape and stitched  around one side.  Pressed and wrapped it around to the backside, pinning in place, ensuring to cover the first stitch line.


Stitched from the front, trying to stay in "the ditch", but since the towel was so fluffy, and I used brown thread, it didn't show at all if I weaved away from the "ditch".  I just tried to stay on the towel side and not stitch into the bias tape.


I added some fun pockets.  Drake's has car fabric from his 2nd birthday outfit I made him, and Violet's has sweet little gathered pockets.


The backs have snaps.  If I did it again, I'd do Velcro or buttons, since the snaps were really hard to set into the plush towel.  Also, the pattern has you stitch the sides.  I think in the future I'll probably remove this stitching and add ties so that it can grow with them.   I'd also say it runs small.  The "2T" fit Violet really well at 14 mos, and she's only 8th percentile!


In action!


A bit fuzzy, but I love this angle!

Thursday, February 14, 2013

Valentine's Cookies!

Sooo I love it when Kelly Ripa talks about watching events on TV like gymnastics, ice skating, etc, and totally thinking that she can do it just by watching.  I feel like I'm the same when it comes to crafting, etc.  I see a picture, a tutorial, a video, and I'm like "I can TOTALLY do that".  And then there's always some point in which I say to myself (or perhaps rather loudly to my husband) "WHAT HAVE I GOTTEN MYSELF INTO?" Enter royal icing.

I've always marveled at the beautiful cookies at bakeries with their clean icing and intricate designs. I mean, really, how cute are these?


 But I've never tried royal icing cookies before, and decided for some reason that I needed to do this for Valentine's Day.  I think it started when I asked Drake what kind of valentines he wanted to do, and he told me "ninja ones", since we have ninja cookie cutters. 

I turned to Google for ninja cookie inspiration and found these:


Cute! Seemingly simple! (LOL) 

I started with this cookie recipe that touted that the cookies don't spread after cutting them out, ensuring they keep their shape.   And while I had to add more water to the recipe than it called for, since it was super duper crumbly, these cookies really did hold their shape.  And are pretty good.  Probably better once there's icing on them!

And then I found a video tutorial on icing them, along with a recipe that was supposedly the best, here. (What she failed to mention on the video is what a HUGE mess this is, ha!) This recipe is from the same place as the cookie dough recipe, and what I found was that this recipe ALSO needed a bunch more water than it called for.  Anyway, once I finally got the icing to stand up to the "10 Second Rule", I started the icing process. 

I loaded up the icing bag.  I hate my icing bags.  I need new ones.  Mine are too small (9").  Almost immediately, the super thin icing started squishing out of the top (it does this a tiny bit with buttercream).  Icing up to my elbows, insert "WHAT HAVE I GOTTEN MYSELF INTO?".  This, folks, is the Aimée Way, lol.  I should probably just get some disposable piping bags...they're such a P.I.T.A. to clean anyway.  (note to self, check on Amazon).

I started by icing the circular cookies, and they are allll wonky (they look worse in person, promise).  Not very circular, more oval-ish.  This is how the night ended, with my lovely husband of mine fixing me a cocktail....

 
And then I started to get the hang of it a bit (BEFORE the cocktail, thank you very much), and once I got to the ninjas, my skillz (yeah, SKILLZ) got better, and they started to look pretty good! Here's a video of me Piping a Ninja (doesn't that sound like the name of a rap song?).  Be jealous of the PJ pants:
Fast forward a day...a trip to Michael's for 16" disposable piping bags...and this girl is in heaven! OMG, so much easier.  No squishing out of the top, a good twist on the bag....and then I got to throw it away when I was done...woot! So here's the finished product:

 I made the toppers in PowerPoint, with some free clipart I found online.  Drake got some great handwriting practice, and I loved to see that he knew how to spell a few of his friends' names!


(Sorry Brent, yours got a little overcooked on the bottom.  Dang oven!) 

 Heart cookies for Violet, a.k.a. Little Miss Sweet Potato, adding the hearts and dots detracts from the oval wonkiness of the white....


Happy Valentine's Day everyone!!!

Thursday, February 7, 2013

Drake's Felt Name Book


I just love to hand embroider on felt.  Felt cuts cleanly, comes in beautiful bright colors, and is pretty kid-resistant.  So when my son turned one, I made him a name book. 
 
I started out with the letters of his name, and stuck with animals as a theme.  I had seen a few beautiful books on crafster.org (so fun to peruse the crafts on there for ideas!)  I turned to Google images to start looking for images to use.  I'd use search terms like "xxx clip art" or something, so I narrowed the search down to cartoon-ish images.  
 
Once I found what I wanted to use, I turned to Powerpoint.  I made an 8"x8" box, since a felt sheet is 8x12, and I wanted a square book.  From there, I pasted my images in, played around with different fonts, and when I was done, I printed each page.


I then cut out the images and the text, and used them as templates to cut out the felt pieces.  I didn't use any glue or anything to hold each piece down, I just held the pieces to the background with one hand and stitched with the other.
 
I LOVE this site for embroidery stitch how-to....they have a picture dictionary where you can just look at the stitches, and click on the one you want to learn how to do: 
 
 
 I did mainly backstitch on the pieces and blanket stitched the pages together, but I did do a few fancier stitches in places.  I also added a few decorative buttons, and sometimes embroidered a few things completely, with no felt (especially if it was a tiny detail like the bird on the R page).  I typically used 3 threads for the embroidery.  I think I used 2 for the eagle to get more detail in the wings.  And I used the full 6 threads for the blanket stitch on the edge.
 
If you didn't know, a drake is a kind of duck, so I went with that for the cover:
 
 
D is for DRAGON

 
R is for RABBIT

 
A is for ALLIGATOR

 
K is for KANGAROO (See the K in the Australian flag?)

 
E is for ELEPHANT

  
R is for RHINOCEROS

 
E is for EGRET

 
E is for EAGLE

 
D is for DONKEY


Close up of the bird on the R page

 
Bird button on top of the tree


I have completed the pages of Violet's book.  Of course she turned one in December, and I haven't bound the book yet with the spine.  Hopefully this post will urge me to finish it and post pictures of hers!

Monday, February 4, 2013

Fabric Storage

If you sew, you know that fabric storage can be a challenge....at least mine got stuffed in any available space with no real rhyme or reason as to what I kept and what I tossed (scraps especially!)

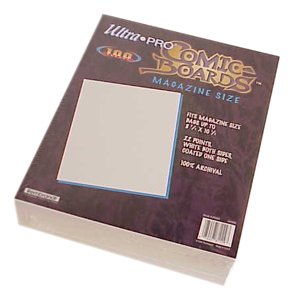
I was talking to someone at the fabric store, and she mentioned storing fabric on acid free cards....brilliant! Mini bolts!  I found these cards on Amazon....they are actually comic book cards.  100 for $9.  They are approximately 7"x10". Find them here.


So one fine day, I pulled out all my fabric.  I mean ALL of it.  Whole pieces, large scraps, small scraps, everything.  I made myself purge stuff I knew I wouldn't use, useless scraps, etc.  Then I folded each piece, wrapped it on a card and used two straight pins to secure each to the card.  I guess you could go even further and write on the edge of the card the fabric content, designer, what not.  I was just happy to get them on the cards!

Look at this beautiful stack of fabric! Even, organized, visible.  Makes the engineer side of me really happy.  I love looking at these, recognizing the projects I've done and thinking of projects to come.  See the white with purple flowers on it, 6th down? That will be Violet's Easter dress I think!


After bolt-ing (I love to make up words, lol) the fabric, I put it all in bins under my bed.  A sewing/craft room would be the ideal dream, but for now, creative storage is key! It's so satisfying to go look for a piece of fabric, and to pull these bins out and see this:


I do a lot of applique, so small scraps of cotton can actually be used.  So I kept what I wanted, tossed the rest, and put the scraps into plastic bags.  I took it one step further and put them in the bags by color families (sort of). 


So there you have it, complete fabric organization for $9.  And those 100 cards will last me FOREVER. 


Friday, February 1, 2013

Welcome to my blog!

My whole life, I've tended to be creative, and to think of things in ways that maybe other people don't (unbeknownst to me, sometimes!).  My sister coined this "the Aimée way" when we were younger.  Maybe I did something unconventionally, creatively, ridiculously, or just the plain "wrong" way, according to some.  I thought this would be an appropriate title for this blog, as I venture through various projects, and attack them in my own fashion.

My mom taught me to sew when I was little, starting with making doll clothes and then trying my hand at other projects as I grew up.  As a mother myself, now, I delight in making things for my son Drake (4.5) and my daughter, Violet, who just turned one.  I hope you enjoy following my through my project journeys!

Violet's Heart Dress

Oh, Pinterest, how I love you.  I bought a precious piece of fabric for Violet with teeny tiny pink hearts at the recent 40% off sale at Textile, without having a plan as to what to do with it.

I turned to Pinterest for design ideas, scouring DIY baby dresses for "the one".  I found inspiration in this tutorial on how to make a pin tucked bib:


I love the buttons, the waist accent color, and the 3/4 sleeves.  Just darling!  It's from the CraftinessIsNotOptional blog.  Love that blog's name! Click here for the tutorial.  Isn't her baby so cute?

Anyway, her tutorial has you create a pattern from an existing dress.  Never works for me.  I tried, made a muslin of the bodice, and it was too small.  So, off to JoAnn's for me, and I bought a basic baby dress pattern.  As it's foiled me in the past, I made sure to measure Violet, and not just go by her age on the size chart.  I ended up making a 6 month size, even though she's 13 mos! (Granted she's only about 8th percentile, but still....crazy sizing).

I had to adapt the pattern to put an invisible zipper in the back instead of buttons.  Since this pleated bib continued to the back, and it already has buttons on the front, I opted for this like Craftiness's tutorial.  I also trimmed the sleeves in pink, and made a big sash for the back (I just LOVE a big fat bow on the back of a baby dress!)

I won't rehash the tutorial, but a few things I did that are not outlined:

  • I added a full bodice lining.  I cut a second set of front and back pieces and sewed them together at the shoulder seams.  Then, right sides together, I stitched at the neckline (instead of doing this with the bib like the tutorial.  Here is the dress, inside out, with the lining attached at the neckline, but not yet tacked down at the waistline and zipper: 

  • Next, I ironed a 5/8" fold along the bottom of the lining (at the waistline).  I pinned the lining down along the waistline and zipper.  (I also pinned around the armholes to make sure the lining was laying flat.   (Don't pin the lining too close, make sure zipper can still zip up!)

So here she is, our Little Miss Sweet Potato (nickname penned by Drake).  She was twisting the skirt back and forth when I put it on her.  How do little girls just innately know to do that?


And the back....told ya, biiiig bow!   She's doing her favorite thing right now...playing with the doorknob.  And standing on a stool.  Big girl!